Introduction
The Ubuntu operating system’s latest Long Term Support (LTS) release, Ubuntu 18.04 (Bionic Beaver), was released on April 26, 2018. This guide will explain how to upgrade an Ubuntu system of version 16.04 or later to Ubuntu 18.04.
Warning: As with almost any upgrade between major releases of an operating system, this process carries an inherent risk of failure, data loss, or broken software configuration. Comprehensive backups and extensive testing are strongly advised.
To avoid these problems, we recommend migrating to a fresh Ubuntu 18.04 server rather than upgrading in-place. You may still need to review differences in software configuration when upgrading, but the core system will likely have greater stability. You can follow our series on how to migrate to a new Linux server to learn how to migrate between servers.
Prerequisites
This guide assumes that you have an Ubuntu 16.04 or later system configured with a sudo-enabled non-root user.
Potential Pitfalls
Although many systems can be upgraded in place without incident, it is often safer and more predictable to migrate to a major new release by installing the distribution from scratch, configuring services with careful testing along the way, and migrating application or user data as a separate step.
You should never upgrade a production system without first testing all of your deployed software and services against the upgrade in a staging environment. Keep in mind that libraries, languages, and system services may have changed substantially. Before upgrading, consider reading the [Bionic Beaver Release Notes][https://wiki.ubuntu.com/bionicbeaver/releasenotes] and our article What’s New in Ubuntu 18.04.
Step 1 – Backing Up Your System
Before attempting a major upgrade on any system, you should make sure you won’t lose data if the upgrade goes awry. The best way to accomplish this is to make a backup of your entire filesystem. Failing that, ensure that you have copies of user home directories, any custom configuration files, and data stored by services such as relational databases.
On a DigitalOcean Droplet, one approach is to power down the system and take a snapshot (powering down ensures that the filesystem will be more consistent). See [How To Use DigitalOcean Snapshots to Automatically Backup your Droplets][https://www.digitalocean.com/community/tutorials/how-to-use-digitalocean-snapshots-to-automatically-backup-your-droplets] for more details on the snapshot process. After you have verified that the Ubuntu update was successful, you can delete the snapshot so that you will no longer be charged for its storage.
For backup methods which will work on most Ubuntu systems, see [How To Choose an Effective Backup Strategy for your VPS][https://www.digitalocean.com/community/tutorials/how-to-choose-an-effective-backup-strategy-for-your-vps].
Step 2 – Updating Currently Installed Packages
Before beginning the release upgrade, it’s safest to update to the latest versions of all packages for the current release. Begin by updating the package list:
- sudo apt-get update
Next, upgrade installed packages to their latest available versions:
- sudo apt-get upgrade
You will be shown a list of upgrades, and prompted to continue. Answer y for yes and press Enter.
This process may take some time. Once it finishes, use the dist-upgrade command with apt-get, which will perform any additional upgrades that involve changing dependencies, adding or removing new packages as necessary. This will handle a set of upgrades which may have been held back by apt-get upgrade:
- sudo apt-get dist-upgrade
Again, answer y when prompted to continue, and wait for upgrades to finish.
Now that you have an up-to-date installation of Ubuntu, you can use do-release-upgrade to upgrade to the 18.04 release.
Step 3 – Upgrading with Ubuntu’s do-release-upgrade Tool
Traditionally, Ubuntu releases have been upgradeable by changing Apt’s /etc/apt/sources.list – which specifies package repositories – and using apt-get dist-upgrade to perform the upgrade itself. Though this process is still likely to work, Ubuntu provides a tool called do-release-upgrade to make the upgrade safer and easier.
do-release-upgrade handles checking for a new release, updating sources.list, and a range of other tasks, and is the officially recommended upgrade path for server upgrades which must be performed over a remote connection.
Start by running do-release-upgrade with no options:
- sudo do-release-upgrade
If the new Ubuntu version has not been officially released yet, you may get the following output:
Checking for a new Ubuntu release
No new release found
If this is the case, add the -d option to upgrade to the development release:
- sudo do-release-upgrade -d
If you’re connected to your system over SSH, you’ll be asked whether you wish to continue. For virtual machines or managed servers you should keep in mind that losing SSH connectivity is a risk, particularly if you don’t have another means of remotely connecting to the system’s console. For other systems under your control, remember that it’s safest to perform major operating system upgrades only when you have direct physical access to the machine.
At the prompt, type y and press Enter to continue:
Reading cache

Checking package manager

Continue running under SSH?

This session appears to be running under ssh. It is not recommended
to perform a upgrade over ssh currently because in case of failure it
is harder to recover.

If you continue, an additional ssh daemon will be started at port
'1022'.
Do you want to continue?

Continue [yN] y
Next, you’ll be informed that do-release-upgrade is starting a new instance of sshd on port 1022:
Starting additional sshd

To make recovery in case of failure easier, an additional sshd will
be started on port '1022'. If anything goes wrong with the running
ssh you can still connect to the additional one.
If you run a firewall, you may need to temporarily open this port. As
this is potentially dangerous it's not done automatically. You can
open the port with e.g.:
'iptables -I INPUT -p tcp --dport 1022 -j ACCEPT'

To continue please press [ENTER]
Press Enter. Next, you may be warned that a mirror entry was not found. On DigitalOcean systems, it is safe to ignore this warning and proceed with the upgrade, since a local mirror for 18.04 is in fact available. Enter y:
Updating repository information

No valid mirror found

While scanning your repository information no mirror entry for the
upgrade was found. This can happen if you run an internal mirror or
if the mirror information is out of date.

Do you want to rewrite your 'sources.list' file anyway? If you choose
'Yes' here it will update all 'xenial' to 'bionic' entries.
If you select 'No' the upgrade will cancel.

Continue [yN] y
Once the new package lists have been downloaded and changes calculated, you’ll be asked if you want to start the upgrade. Again, enter y to continue:
Do you want to start the upgrade?


6 installed packages are no longer supported by Canonical. You can
still get support from the community.

9 packages are going to be removed. 104 new packages are going to be
installed. 399 packages are going to be upgraded.

You have to download a total of 232 M. This download will take about
46 seconds with your connection.

Installing the upgrade can take several hours. Once the download has
finished, the process cannot be canceled.

 Continue [yN]  Details [d]y
New packages will now be retrieved, unpacked, and installed. Even if your system is on a fast connection, this will take a while.
During the installation, you may be presented with interactive dialogs for various questions. For example, you may be asked if you want to automatically restart services when required:
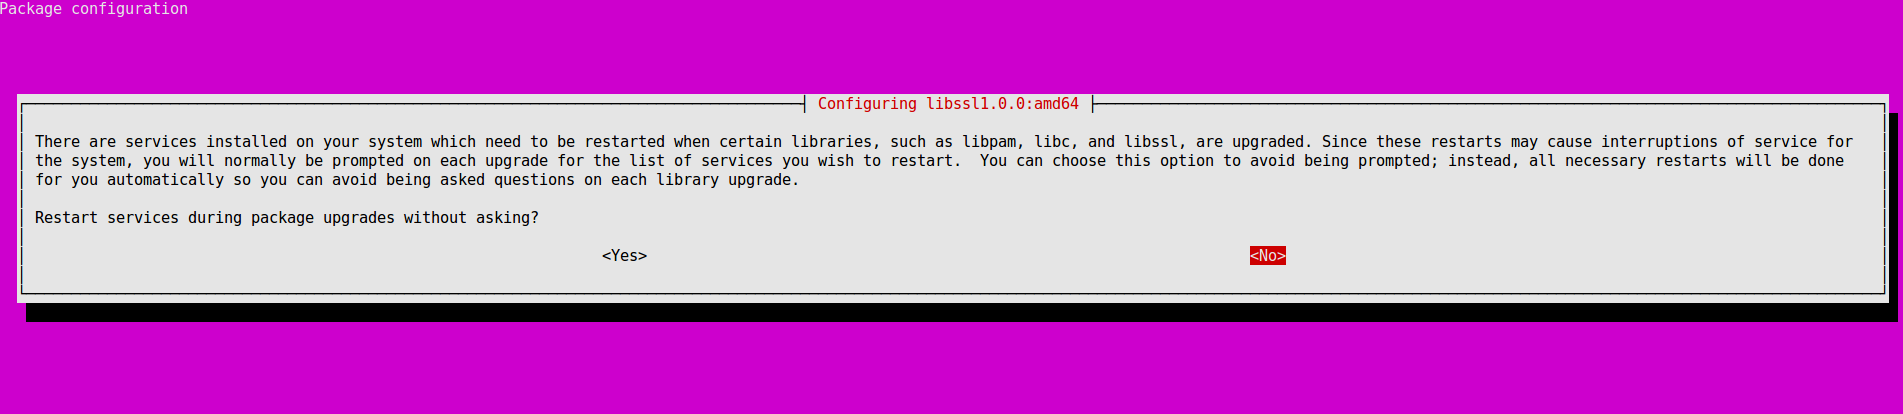
In this case, it is safe to answer Yes. In other cases, you may be asked if you wish to replace a configuration file that you have modified. This is often a judgment call, and is likely to require knowledge about specific software that is outside the scope of this tutorial.
Once new packages have finished installing, you’ll be asked whether you’re ready to remove obsolete packages. On a stock system with no custom configuration, it should be safe to enter y here. On a system you have modified heavily, you may wish to enter d and inspect the list of packages to be removed, in case it includes anything you’ll need to reinstall later.
Remove obsolete packages?


53 packages are going to be removed.

 Continue [yN]  Details [d]y
Finally, assuming all has gone well, you’ll be informed that the upgrade is complete and a restart is required. Enter y to continue:
System upgrade is complete.

Restart required

To finish the upgrade, a restart is required.
If you select 'y' the system will be restarted.

Continue [yN] y
On an SSH session, you’ll likely see something like the following:
Connection to 203.0.113.241 closed by remote host.
Connection to 203.0.113.241 closed.
You may need to press a key here to exit to your local prompt, since your SSH session will have terminated on the server end.
Wait a moment for your server to reboot, then reconnect. On login, you should be greeted by a message confirming that you’re now on Bionic Beaver:
Welcome to Ubuntu 18.04 LTS (GNU/Linux 4.15.0-19-generic x86_64)
Conclusion
You should now have a working Ubuntu 18.04 installation. From here, you likely need to investigate necessary configuration changes to services and deployed applications.
You can find more 18.04 tutorials on our Ubuntu 18.04 Tutorials tag page.