If you want to transfer music from iPod to computer Windows 10 for backup or you just want to listen to the music on your computer, you can take advantage of iTunes iCloud or third-party software to help you. But the solutions are not limited to these methods. Asides from official tools like iTunes and iCloud, Windows Explorer, Dropbox, as well as iOS data transfer tool would be your quick solutions. If this is what you are looking for, then stop here for more information and refer to the following ways to easily transfer music from iPod to computer Windows 10.
Option 1: Use Cloud to Transfer Music from iPod to Computer Windows 10
For some users, they may have spent a large sum of money on iTunes to purchase their favorite songs to iPod. However, you can still keep these purchased songs even if you don’t keep using iPod any more. What you can do is to make full use of iCloud to transfer music from iPod to computer Windows 10. Here there are two general ways to solve the problem.
1. iCloud Music Library
iCloud is not only used to store users’ data on the iPhone, but also is capable of managing all the music files via cloud. You probably have already downloaded all the songs in your iPod, and moving them could be a syncing process. In other words, you can easily get the music downloads via iCloud. What you need to do is to enable the iCloud Music Library option on your iPod and iTunes as well. If you have an old iPod, such as iPod nano or iPod shuffle, then iCloud probably won’t be able to help you. In this case, move down to our second option.
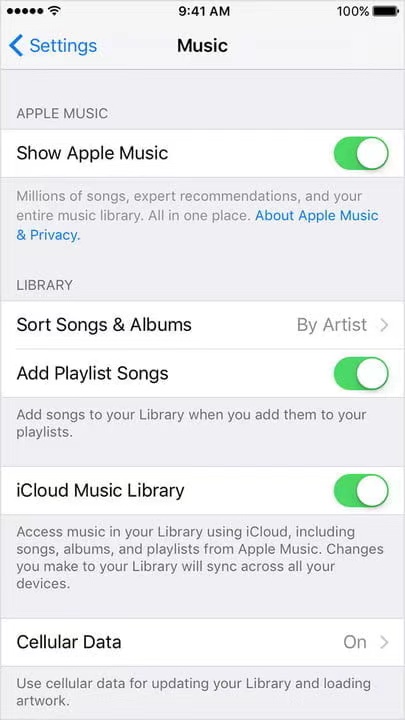
Step 1: If you subscribe to Apple Music, this function is enabled by default. If you disabled it by mistake, you can navigate to “Settings > Your Name > iCloud > Music”. Find iCloud Music Library and toggle it on.
Step 2: All the music would be synced automatically to your iCloud Music Library which could be seen on the Apply Music in the iTunes.
Step 3: Open iTunes on your computer and click Preference to choose checkbox next to iCloud Music Library. Make sure it is enabled. Once it is turned on, all the songs you purchased on iPod could be automatically synced on the iTunes. Then, it is easy to download all these songs to your computer.
2. Restore Purchases
The second method you can try is to restore and re-download the past purchases from iTunes Store on your computer.
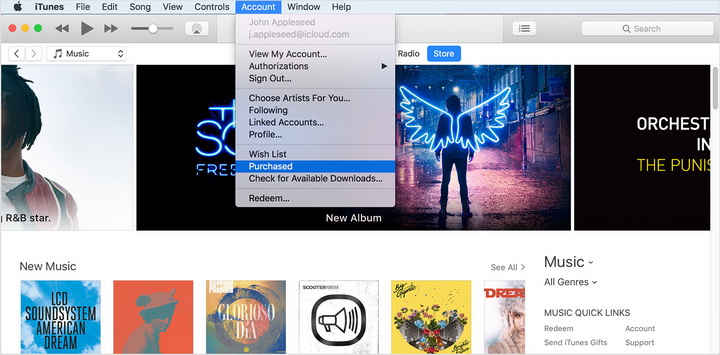
Step 1: Open iTunes and choose Account > Purchased. Then there will be a list of purchased songs on your account.
Step 2: In the upper portion, choose Not in My Library option. Then you can see all the songs that don’t exist on your device.
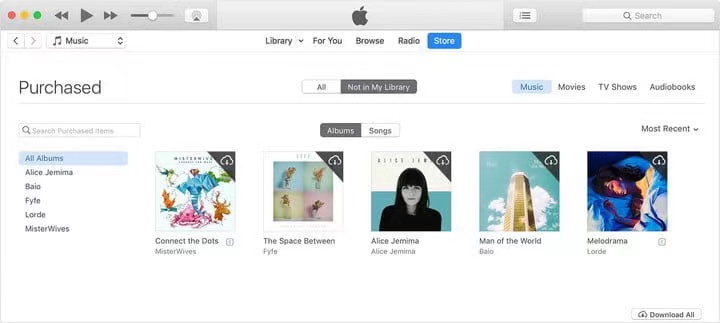
Step 3: Select these songs and download these available songs. Within minutes, these songs would be downloaded soon.
Option 2: Use iTunes to Transfer Music from iPod to Computer Windows 10
iTunes is a freely available desktop application that is developed by Apple, which is a really good choice for you to copy music from iPod to Windows 10. This is a simple way for transferring the purchased music. Once you transfer music from iPod to computer Windows 10, you can access your music on your computer. Let’s check out the detailed steps.
Step 1: Connect your iPod into computer Windows 10 with USB cable and launch the latest iTunes on your computer Windows 10.
Step 2: Go to the left sidebar and click “Music” section.
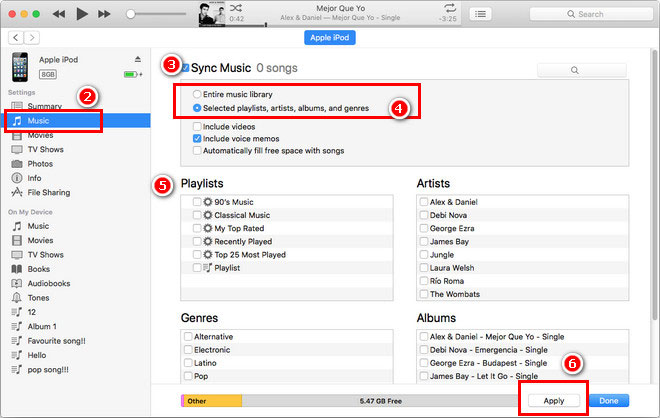
Step 3: You can choose to sync entire library or selected playlist, artists, or album. And then click “Apply” to transfer music from iPod to computer Windows 10.
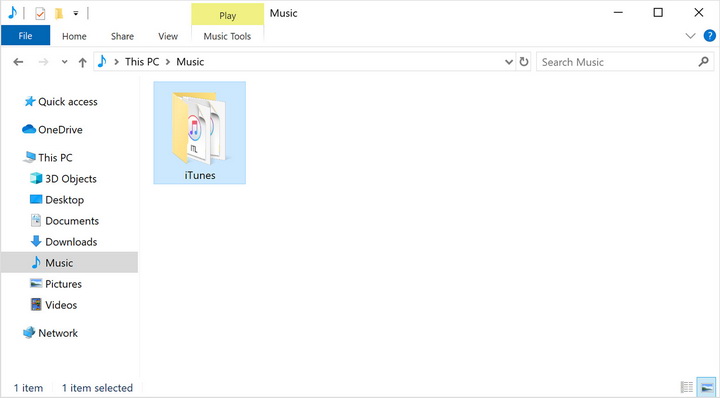
Step 4: Find the iTunes media folder on your computer Windows 10. By default, the exported music will be saved at C:Users/Administrator/Music/iTunes/iTunes Media. Then you can enjoy the music transferred from your iPod on computer Windows 10.
Note
Option 3: Use Windows Explorer to Transfer Music from iPod to Computer Windows 10
Thirdly, you can directly copy the music files from iPod to your computer when your iPod has been connected to your computer. Usually, once the iPod has been connected to your computer, there will be an iPod drive appearing in File Explorer. In the most cases, you can open this drive and find all the files on your iPod. But sometimes some files and folders on your iPod are hidden, which results in the failure to check these files. Before getting started to copy the music files from iPod to computer, you have to dig out all the hidden files and folders. Follow the steps below to show hidden files and folders.
Show Hidden Items in Windows Explorer
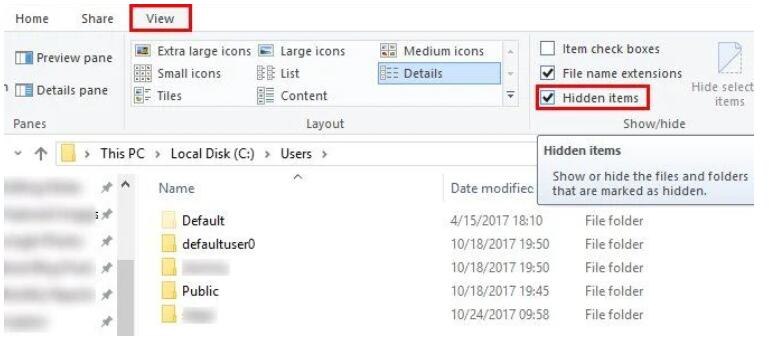
Steps:
- Open a File Explorer window under Computer section.
- Select the View tab and you can see the Show/hide section on the right side. Click the box for Hidden items.
- Once you have chosen the Hidden items, all the hidden files and folders would be seen.
Transfer Music from iPod to computer Windows 10 via Windows Explorer
When all the hidden files and folders on your iPad could be visible in the File Explorer, then you can start transferring music from iPod to computer Windows 10.
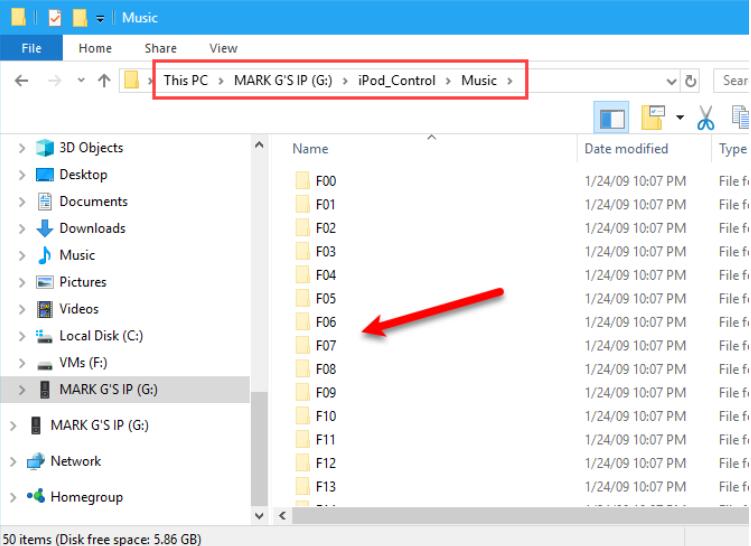
Steps:
- Go to File Explorer and click the iPod drive icon once it has been connected to your computer.
- Open the iPod drive and navigate to the iPod_Control > Music folder. Usually the music folders are labelled with F.
- Select all the folders in the Music folder and right click to choose copy.
- Confirm the saving route you would like to put the iPod music files and right click to choose paste. Then all the music files on your iPod would be saved on your hard drive on the Windows 10. For more details about each file, you can tell them by the random four-letter file names.
Option 4: Use iTransfer to Transfer Music from iPod to Computer Windows 10
Leawo iTransfer is multifunctional transfer software for iOS devices, and it is helpful for transferring data among iOS devices, iTunes and PCs. You can extract music from iPod directly and send them to computer Windows 10 with Leawo iTransfer. It can also help users to add files to their iOS devices without the sync of iTunes. This iPhone transfer software enables users to transfer various kinds of files, including apps, music, videos, TV shows, ebooks, ringtones, photos, Camera Roll, contacts, text messages, bookmarks, and notes. With this iPhone data transfer software, you are able to fully handle your iPhone without messing up the data inside. The following guidance will show you use this iPhone data transfer software to transfer music from iPhone to computer, and you can free download the software to have a try. The following guidance will show you how to transfer music from iPod to computer Windows 10 without iTunes.
Step 1. Download Leawo iTransfer
Download and install Leawo iTransfer on your computer Windows 10.
- Leawo iTransfer– Transfer files among iOS devices, iTunes and PCs with ease.
– 6x faster than iTunes
– Transfer up to 14 kinds of data and files without iTunes.
– Support the latest iOS devices like iPhone 12, iPhone 12 Pro, etc.
– Play back, view, and delete data and files on iOS devices.
– Support Windows & Mac OSDownloadDownload
Step 2. Connect iPod to computer
Launch Leawo iTransfer and connect your iPod to computer Windows 10 with match USB cable.
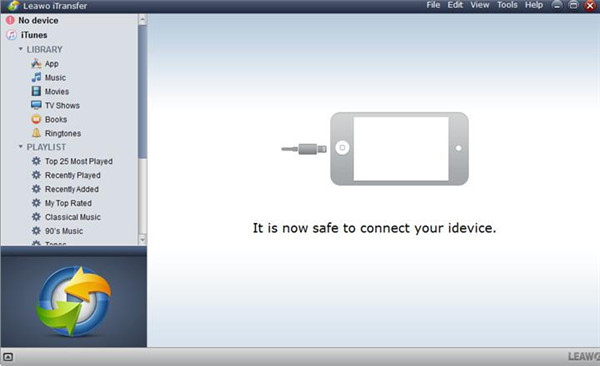
Step 3. Select Files and Tap “Transfer”
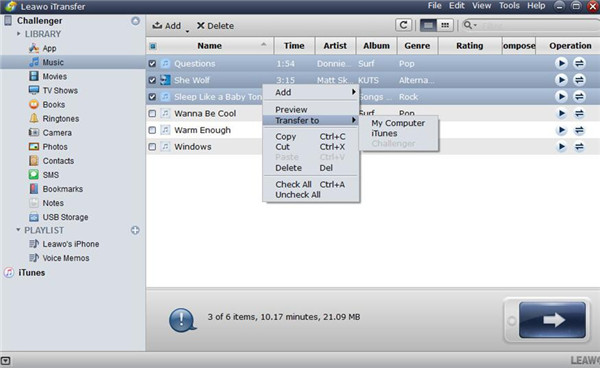
Tap the name of your iPod and select “Your iPod Name > Library > Music” panel in the left interface. Select the music you want to transfer in the right interface and tick the empty square beside the “Name” list of songs and click the “Transfer” button at the right bottom. You can also click the name of iPod and choose Music in the left sidebar. The iPod music files will appear in the right part.
Step 4. Set Output Folder and Transfer Music
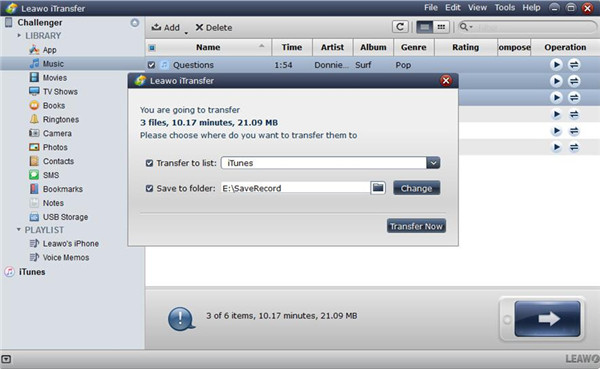
A panel will pop up, and you need to set the output folder of the exported music. Check “Save to Folder” in the dialog and tap “Change” to choose a folder in your PC Windows 10. Tap “Transfer Now” to begin to transfer music from iPod to PC Windows 10. Wait until the transfer process is over. Or check the checkbox beside each song to select certain songs, and right-click a selected song, then choose Transfer to > My Computer. Then, wait for the next step to transfer music files.
Option 5: Use Dropbox to Transfer Music from iPod to Computer Windows 10
You can also use Dropbpx to transfer Music from iPod to computer Windows 10. Make sure you download and install Dropbox on both your iPod and computer. Then you can follow the specific steps to transfer music from iPod to PC Windows 10
Steps:
- Launch Dropbox on your iPod, and then log in the account you own. If you don’t have a Dropbox account, you can click on “I don’t have an account” to create a new one.
- Upload the music in your iPod to Dropbox.
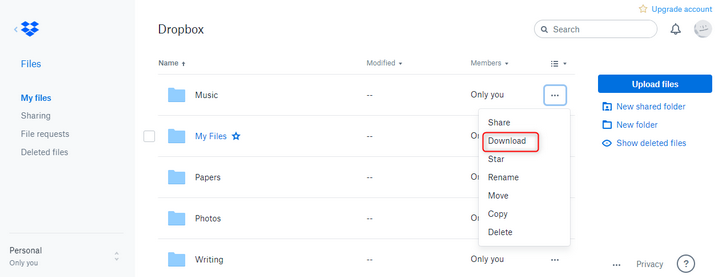
- Launch Dropbox on your computer Windows 10 and navigate to Dropbox folder, where you can download the uploaded music.
With this guidance, you can finally transfer music from iPod to computer Windows 10 directly via 5 methods mentioned above. Among which, iTransfer is highly recommended you, for it can be used to transfer up to 12 kinds of files among different devices, such iOS devices, computers and iTunes. No need to about data loss.
