This guide explains how to setup and use rclone to sync data between HPC clusters and Google Drive.
Rclone can be used with a wide variety of cloud services including box, but this example deals specifically with Google Drive.
Full documentation on using rclone can be found here: https://rclone.org/
We recommend using rclone with your ISU Google account which provides unlimited space. You can use your personal account as well of course, but it will not have unlimited space.
To use rclone you must have a cymail account and have accessed it at least once to initialize it in the google cloud.
To setup rclone login to a cluster dtn node (condodtn, novadtn, hpc-class-dtn) with ssh, load the rclone module with “module load rclone” and then run “rclone config”.
Then run though the setup dialog as shown below.
$ rclone config
2019/02/12 16:28:28 NOTICE: Config file “/home/netid/.config/rclone/rclone.conf” not found – using defaults
No remotes found – make a new one
n) New remote
s) Set configuration password
q) Quit config
n/s/q> n
The “name” can be whatever you like, you will need to type it in every rclone command so you might want to keep it short and memorable.
name> gdrive
At the time this documentation was created Google Drive is 11
Type of storage to configure.
Enter a string value. Press Enter for the default (“”).
Choose a number from below, or type in your own value
1 / Alias for a existing remote
\ “alias”
2 / Amazon Drive
\ “amazon cloud drive”
3 / Amazon S3 Compliant Storage Providers (AWS, Ceph, Dreamhost, IBM COS, Minio)
\ “s3”
4 / Backblaze B2
\ “b2”
5 / Box
\ “box”
6 / Cache a remote
\ “cache”
7 / Dropbox
\ “dropbox”
8 / Encrypt/Decrypt a remote
\ “crypt”
9 / FTP Connection
\ “ftp”
10 / Google Cloud Storage (this is not Google Drive)
\ “google cloud storage”
11 / Google Drive
\ “drive”
12 / Hubic
\ “hubic”
13 / JottaCloud
\ “jottacloud”
14 / Local Disk
\ “local”
15 / Mega
\ “mega”
16 / Microsoft Azure Blob Storage
\ “azureblob”
17 / Microsoft OneDrive
\ “onedrive”
18 / OpenDrive
\ “opendrive”
19 / Openstack Swift (Rackspace Cloud Files, Memset Memstore, OVH)
\ “swift”
20 / Pcloud
\ “pcloud”
21 / QingCloud Object Storage
\ “qingstor”
22 / SSH/SFTP Connection
\ “sftp”
23 / Webdav
\ “webdav”
24 / Yandex Disk
\ “yandex”
25 / http Connection
\ “http”
Storage> 11
The next 2 parameters should be left blank
Google Application Client Id
Leave blank normally.
Enter a string value. Press Enter for the default (“”).
client_id>
Google Application Client Secret
Leave blank normally.
Enter a string value. Press Enter for the default (“”).
client_secret>
Scope will be Full Access if you wish to write to the drive
Scope that rclone should use when requesting access from drive.
Enter a string value. Press Enter for the default (“”).
Choose a number from below, or type in your own value
1 / Full access all files, excluding Application Data Folder.
\ “drive”
2 / Read-only access to file metadata and file contents.
\ “drive.readonly”
/ Access to files created by rclone only.
3 | These are visible in the drive website.
| File authorization is revoked when the user deauthorizes the app.
\ “drive.file”
/ Allows read and write access to the Application Data folder.
4 | This is not visible in the drive website.
\ “drive.appfolder”
/ Allows read-only access to file metadata but
5 | does not allow any access to read or download file content.
\ “drive.metadata.readonly”
scope> 1
Leave the next 2 parameters blank
ID of the root folder
Leave blank normally.
Fill in to access “Computers” folders. (see docs).
Enter a string value. Press Enter for the default (“”).
root_folder_id>
Service Account Credentials JSON file path
Leave blank normally.
Needed only if you want use SA instead of interactive login.
Enter a string value. Press Enter for the default (“”).
service_account_file>
Enter n for advanced config
Edit advanced config? (y/n)
y) Yes
n) No
y/n> n
Enter n for auto config
Remote config
Use auto config?
* Say Y if not sure
* Say N if you are working on a remote or headless machine or Y didn’t work
y) Yes
n) No
y/n> n
If your browser doesn’t open automatically go to the following link: https://accounts.google.com/o/oauth2/auth?access_type=offline&client_id=3534534f44.apps.googleusercontent.com&redirect_uri=urn%3Aietf%3Awg%3Aoauth%3A2.0%3Aoob&response_type=code&scope=https%3A%2F%2Fwww.googleapis.com%2Fauth%2Fdrive&state=fgsdrgrvaeebwergrvsgbe5rd9e7
Log in and authorize rclone for access
Enter verification code>
At this point open a browser on your local workstation and copy the entire URL into a private/incogito browser window.
enter your ISU NetID as an email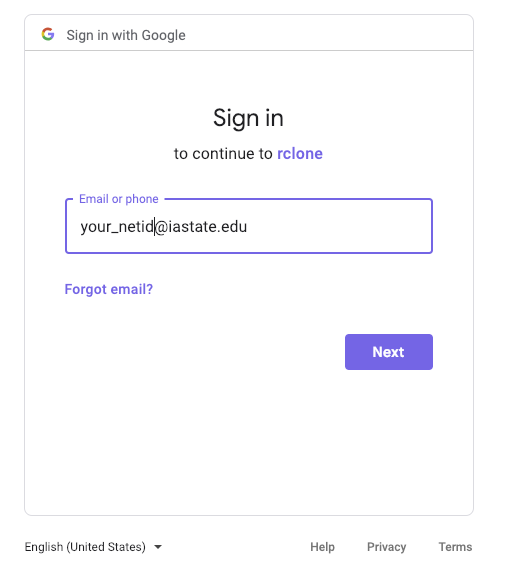 Google Sign-in Page
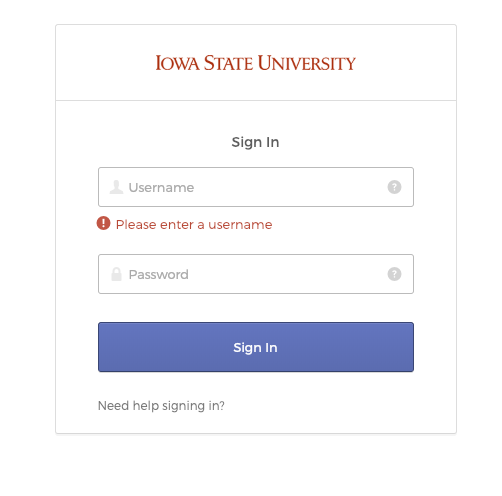
You should then get your usual ISU Okta SSO login
After correctly identifying you will see this screen.
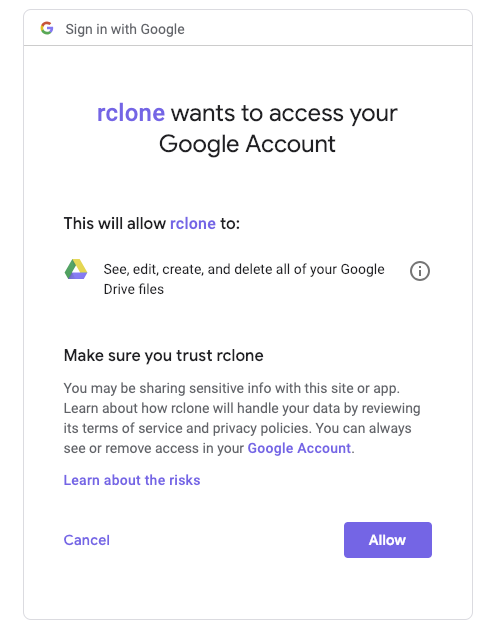
Click Allow
Now enter the code shown on the next screen back into the rclone config
Enter verification code> rgsgsgsrgsgreX06ZesfaevaefavsdgsrsrsrvsvrvsrrYff
Do not configure this as a team drive
Configure this as a team drive?
y) Yes
n) No
y/n> n
You will now get a summary, type y if everything is ok
——————–
[gdrive]
type = drive
scope = drive
token = {“access_token”:”asdfadsfasdfaeaefaseaefaefaefaeJ6asdfaefaewfaaefaevaeaefaewfawefawefeffvvrvrvrvr”,”token_type”:”Bearer”,”refresh_token”:”1asdfasdfasfaefaefaefafaafaefawesfaefaewf”,”expiry”:”2019-02-12T17:31:49.265667681-06:00″}
——————–
y) Yes this is OK
e) Edit this remote
d) Delete this remote
y/e/d> y
You will again get a summary, now type q
Current remotes:
Name Type
==== ====
gdrive drive
e) Edit existing remote
n) New remote
d) Delete remote
r) Rename remote
c) Copy remote
s) Set configuration password
q) Quit config
e/n/d/r/c/s/q> q
You can now use it like this,
List directories in top level of your drive
rclone lsd gdrive:
List all the files in your drive
rclone ls gdrive:
To copy a local directory to a drive directory called backup
rclone copy /home/source gdrive:backupLimitations
Google Drive has rate limiting. This causes rclone to be limited to transferring about 2 files per second only. Individual files may be transferred much faster at 100s of MBytes/s but lots of small files can take a long time. Google Drive limits us to 750 GB/person/day. If you exceed 750G you may be banned until the following day. This is problematic for large transfers or lots of files. If your planning on transferring more than 750G use the “–bwlimit 8.6” option this should keep you under the 750G limit. Doing so should allow arbitrarily large transfers. Google Drive supports single files up to 5TB. There are also some limits on filenames. The “Advanced Rclone” instructions show a possible way of dealing with these limitations.
More Commands
For full information on the rclone commands and their syntax see here: https://rclone.org/
Group Accounts
We recommend using group role accounts to store data long term so your entire research group can access it in the future. Google Drive does have a “team drive” feature but that is not currently enabled for Iowa State accounts.
Transferring ownership of files
If you store your data in an individual account when you leave ISU you may need to transfer your files to another user or your major professor.
These are the Google instructions on doing so:
from https://support.google.com/drive/answer/2494892?hl=en
Transfer file ownership
You’re the owner by default for files that you create in Docs, Sheets, and Slides, or upload into Drive. But, you can transfer ownership of your Google files (Docs, Sheets, and Slides) and folders to anyone you’d like, as long as that person has a Google Account.
Note: If you use Google apps through work or school, you can’t transfer ownership to or receive ownership from someone else who is outside of your domain.
How to change owners
You can change who owns a file or folder in Drive.
- Go to Drive or a Docs, Sheets, or Slides home screen.
- Open the sharing box:
- In Drive: Select the file or folder and click the share icon at the top
.
- In a Docs, Sheets, or Slides home screen: Open the file and click Share in the top-right corner of the file
- In Drive: Select the file or folder and click the share icon at the top
- If the new owner already has edit access, skip to Step 4. Otherwise, follow these steps:
- Type the email address of the new owner in the “Invite people” field
- Click Share & save.
- Click Advanced in the bottom-right corner of the sharing box.
- Click the drop-down menu next to the name of the person you want to own the file or folder.
- Select Is owner.
- Click Done.
You’ll have access to the file as an editor after you transfer ownership.
Things to consider before you transfer ownership
- The things you’ll no longer be able to do once you transfer file ownership include:
- Remove others from the file
- Share with as many people as you like
- Change visibility options
- Allow your collaborators to change access privileges for others
- Permanently delete something from Google Drive. After it’s deleted, no one can access it, including those it was shared with.
- When you transfer ownership of a folder from yourself to another person, the new owner of the folder becomes an editor of the files in that folder. The original owners of the files remain the owners, and if the original owner deletes a file, it’ll be removed from the folder.
- If your current Google Account is being deleted, transfer ownership of your files, folders, and Google files to another active account. Once the original account is deleted, you won’t be able to recover any of your files or folders from it.