Rclone is a command-line program that supports file transfers and syncing of files between local storage and Google Drive as well as a number of other storage services, including Dropbox and Swift/S3-based services. Rclone offers options to optimze a transfer and reach higher transfer speeds than other common transfer tools such as scp and rsync. It is written in Go and is free software using a MIT license.
Installation of Rclone
If you wish to use rclone to transfer files to or from CHPC file systems, you can use the CHPC installation of rclone. There is a module to set the proper environment to use the tool. To use you first need to
module load rclone
If you wish to transfer files to/from file systems where neither the source or destination is on CHPC storage, for example when you want to use rclone to move files from your local desktop to Google Drive, you will first need to download and install rclone on the source or destination device.
Configuration of Rclone
The next step is to configure rclone for the transfer partner. Below we give two examples – one for Google Drive and a second for the CHPC archive storage solution, pando. When on CHPC resources, you must do the configuration while in your home directory. You can do the configuration step for multiple storage locations, such as with space on pando at CHPC, for use with the university’s google drive storage, and/or a personal google drive space.
Example 1: Configuration for transferring files to/from the University of Utah’s Google Drive storage.
There is a University of Utah central IT knowledge base article detailing university level storage options such as GSuite for Education, Microsoft O365, and Box. This article includes information on the suitabliity of the different storage options for different types of data. Please follow these university guidelines to determine a suitable location for your data.
There is a short training video that covers this process.
A few notes about this storage:
- Any University faculty, student or staff can activate and access their official U of U Google Drive by visiting the above link and logging in.
- Through a partnership between the University of Utah and Google for Education, U faculty, staff and students have access to unlimited storage (up from 15GB) in Google Drive
- The University’s Google Drive offered via the GSuite for Education is now suitable for storing sensitive and restricted data. For additional security information, consult the Security Section of the above link.
Update — 10 October 2017: We have been informed that there are now daily limits on the amount of data that a user can transfer to/from Google Drive. The limits have been determined to be an upload limit of 750GB/day, and a download limit between 9 and 10TB/day.
Update — 8 March 2021: Google has announced that effective July 2022 the storage offered through the Google Workspace for Education (previously known as GSuite for Education) will no longer be unlimited. The new model will provide a base storage of 100 TB of pooled storage across all users from an institution. Here is the link to the announcement: Google Workspace for Education storage policy changes. As we obtain more information we will add additional updates.
To configure (remember to first load the rclone module):
Note: If you are doing this to set up rclone to transfer data to/from CHPC resources, you must do this from a fastX session (preferred) or a ssh session with X-forwarding enabled on a CHPC resources such as an interactive cluster node. In one of the configuration steps a web browser will be opened on the server on which you have the ssh session, and without X-forwarding this will not work; in addition, the backup URL given at this point is only valid from the server on which you are doing the configuration.
rclone config
This command will create a .rclone.conf file in your current directory which contains the setup information. You will be asked a few questions:
1. Choose ‘New remote’
[u1234567@notchpeak1 ~]$ rclone config
Current remotes:
Name      Type
====      ====
pandoDr   drive

e) Edit existing remote
n) New remote
d) Delete remote
r) Rename remote
c) Copy remote
s) Set configuration password
q) Quit config
e/n/d/r/c/s/q> n
2. Enter a name for the Google Drive Rclone handle. This will be typed out whenever you want to access the Drive, so make it short.
name> gcloud
3. Select Google Drive (“drive”)
<long list of types>
12 / Google Drive
   \ "drive"
<several more types>
Storage> 12
4. Leave the Client ID and Client Secret fields blank–just press enter
<information>
Enter a string value. Press Enter for the default ("").
client_id>
<information>
client_secret>
<more information>
5. Scope – choose 1 (full access)
 <information on Scope>
scope> 1
6. ID of root folder – just press enter
7. Service account credentials – just press enter
8. Advanced configuration – choose no
<information>
root_folder_id>
<information>
service_account_file>
Edit advanced config? (y/n)
y) Yes
n) No
y/n> n
9. Choose ‘Yes’ for auto-config. (If you are recreating a remote, it will ask to refresh. Choose ‘Yes’)
Remote config
Already have a token - refresh?
y) Yes
n) No
y/n> y
Use auto config?
 * Say Y if not sure
 * Say N if you are working on a remote or headless machine
y) Yes
n) No
y/n> y
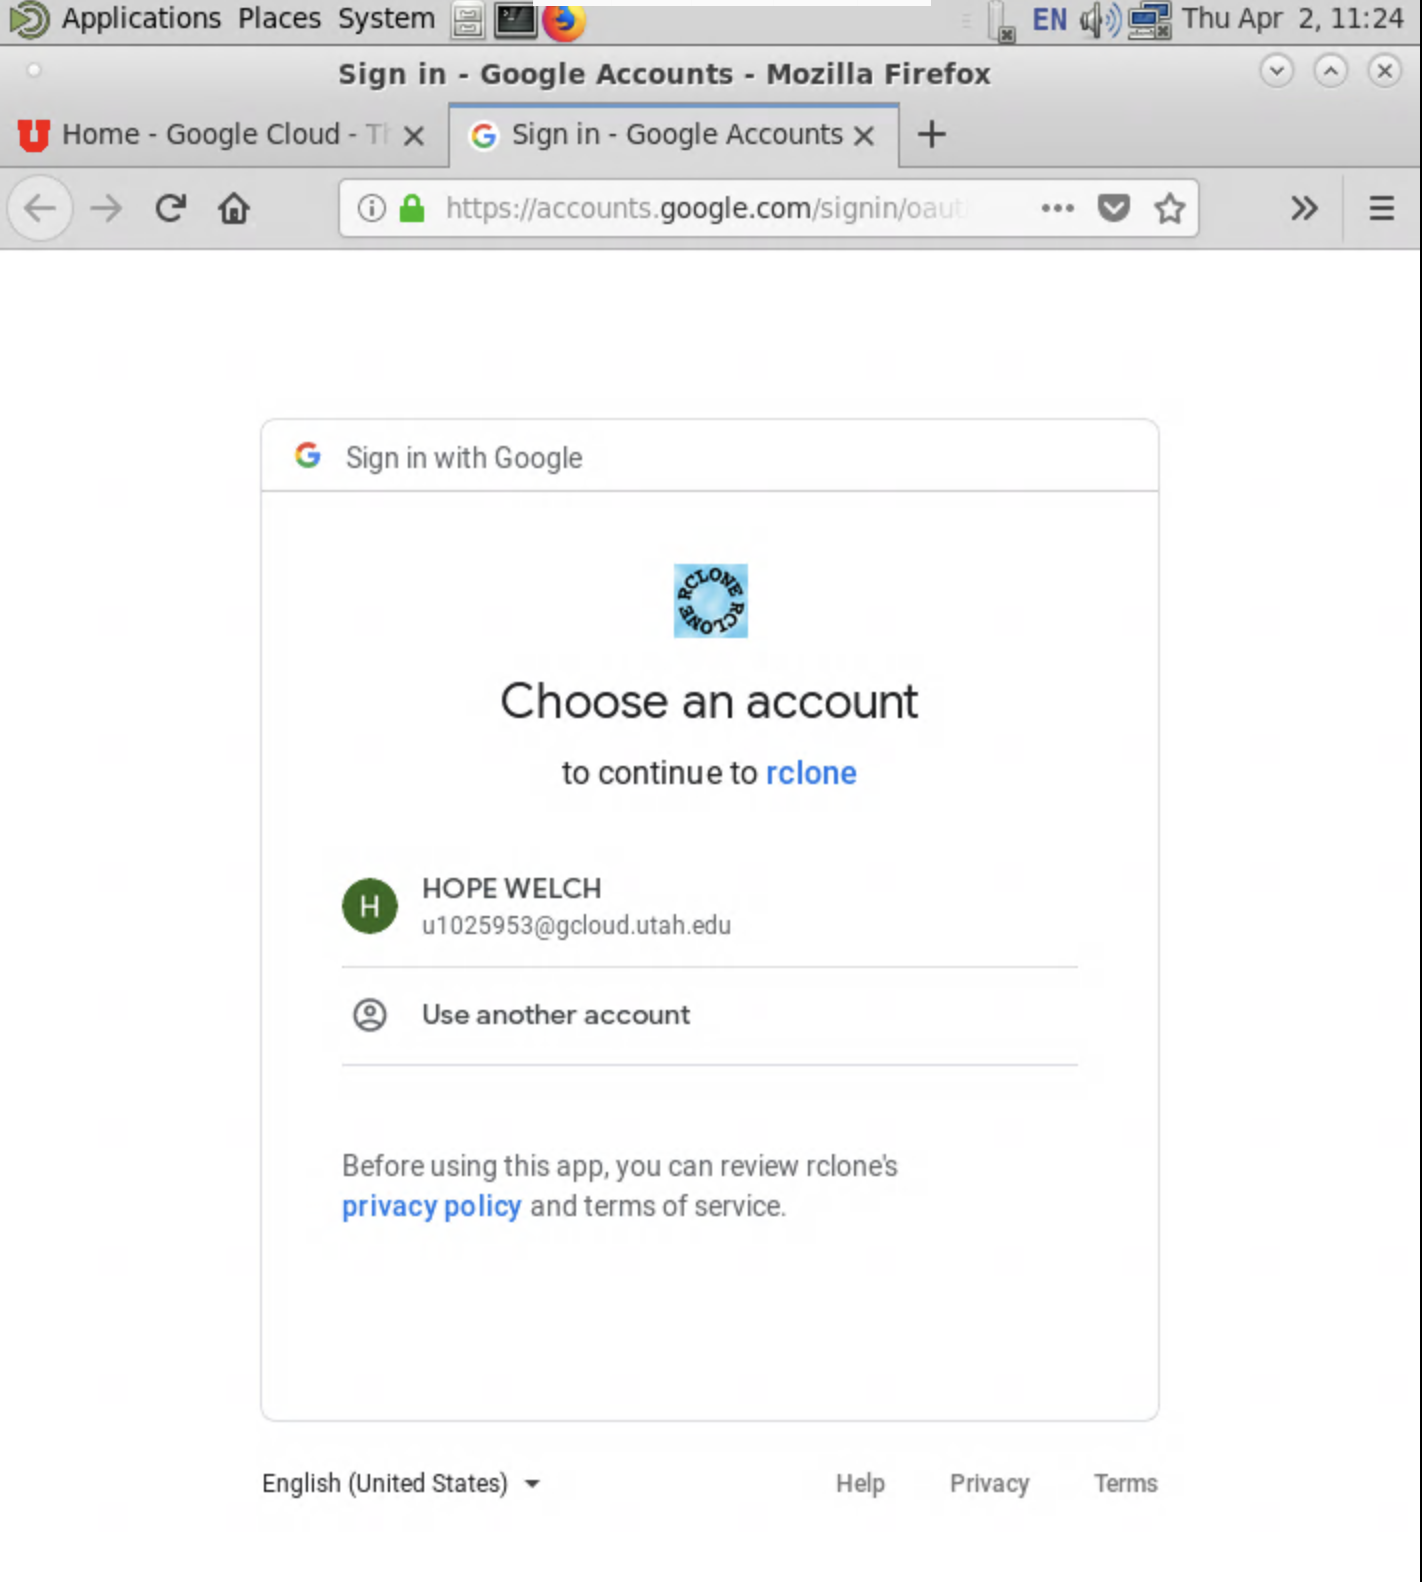
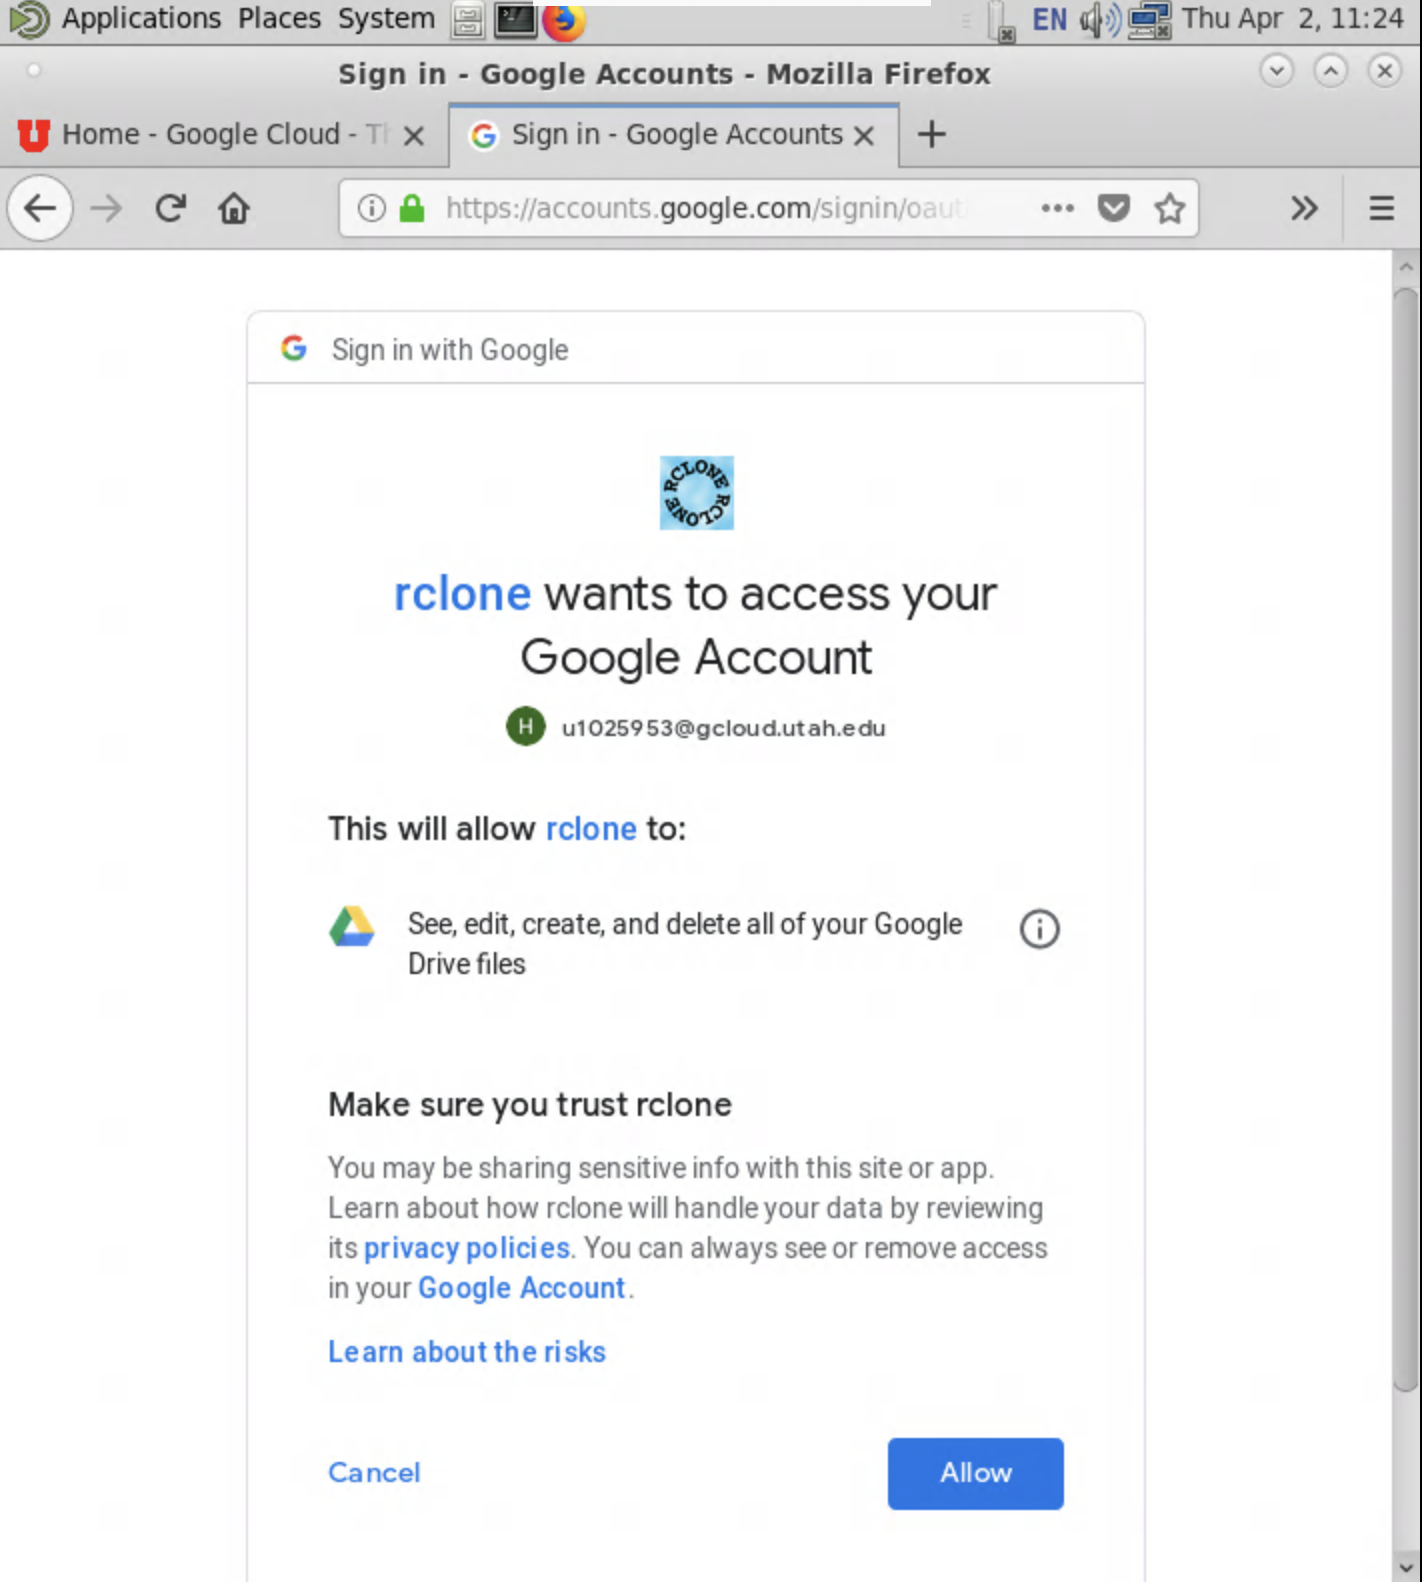
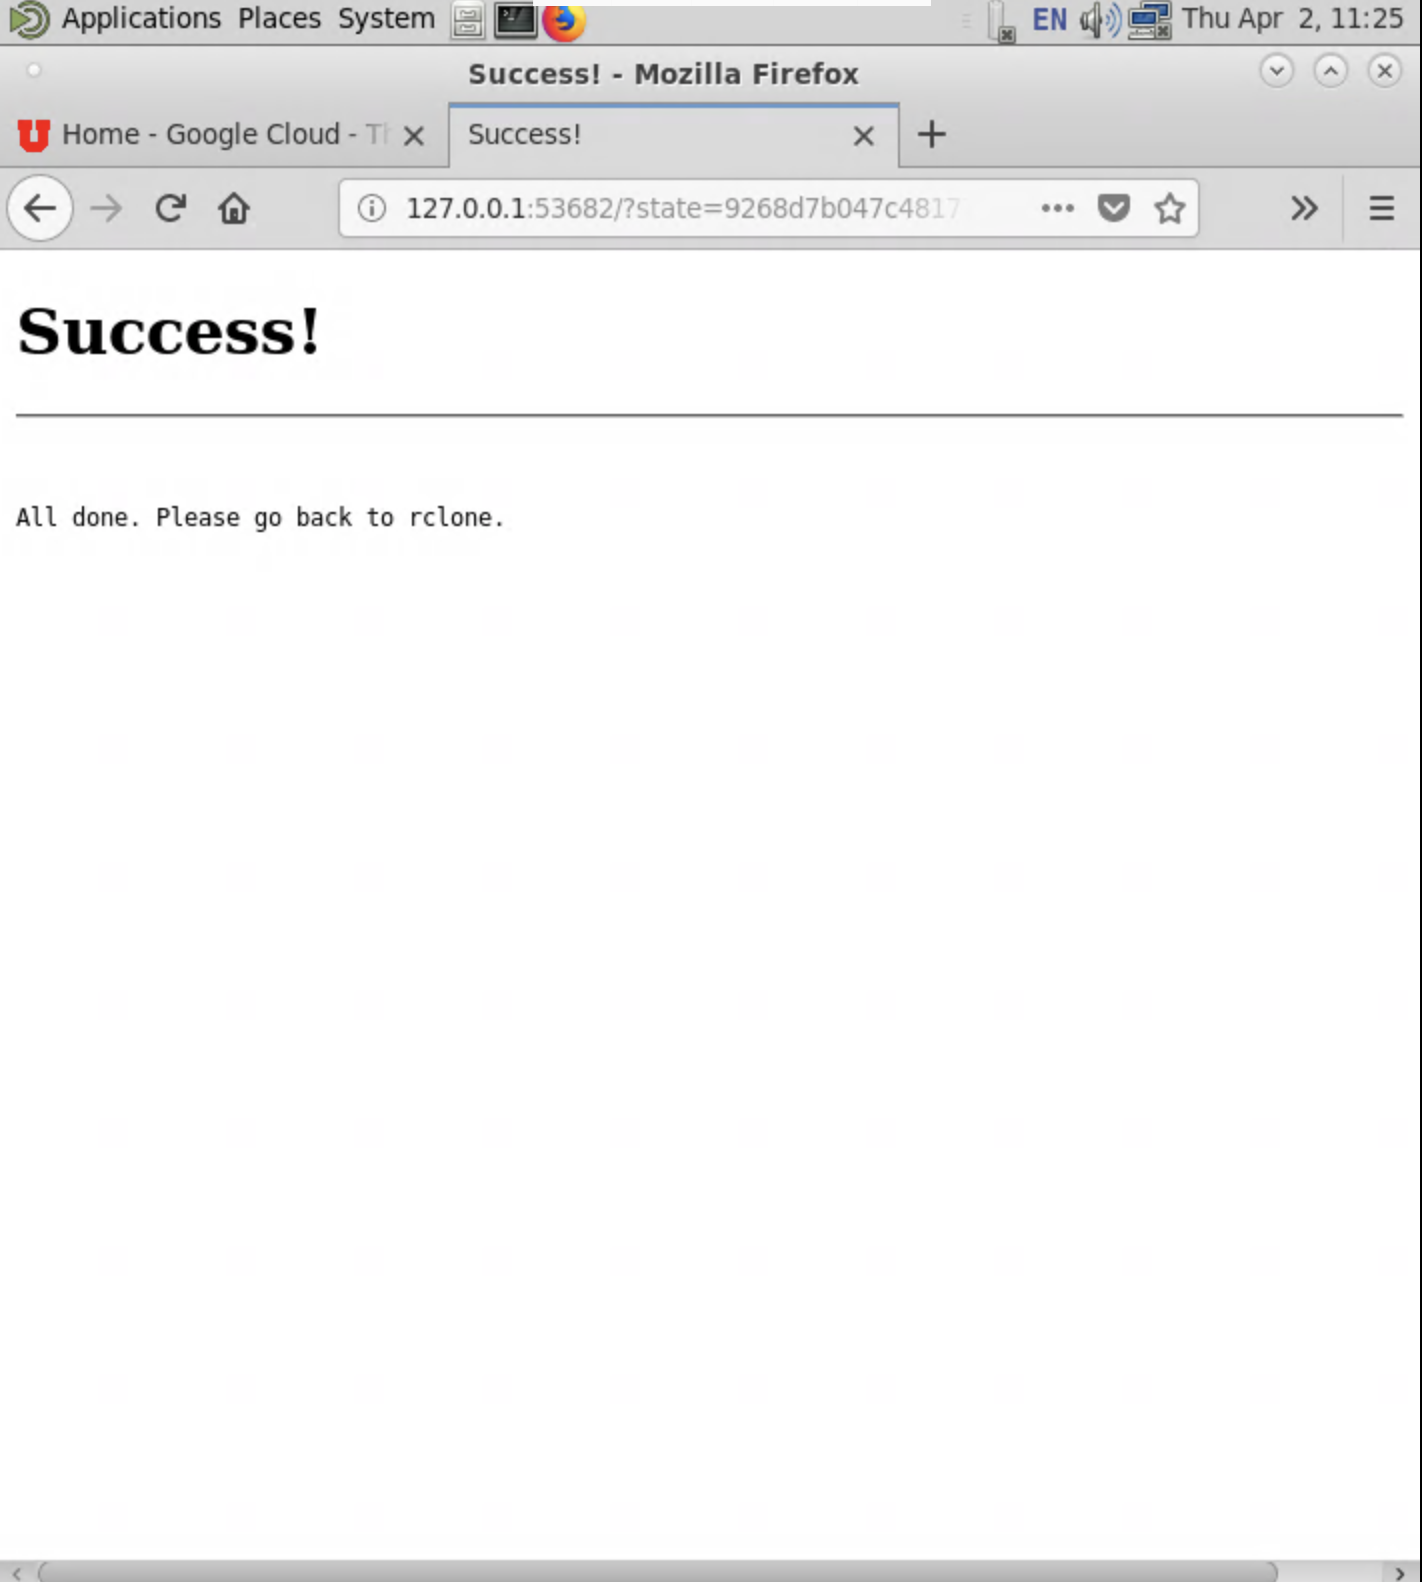
10. A web page will appear (you may first be given a choice of which browser you wish to use) that will make you select the google account to associate the rclone configuration. You will need to allow rclone access. Once completed, the page will tell you that you were successful, and that you need to return to your fastX or ssh session to complete the configuration. Note: at this point there will also be a URL given in case the web page does not open. This URL is only valid from the server on which you are doing the configuration. You cannot use this URL from your local machine.
11.You should select no to the team drive question.
Configure this as a team drive?
y) Yes
n) No
y/n> n
12. Choose Yes to confirm the configuration, and then quit the config
--------------
[gcloud]
type = drive
token = <don't share your token ID>
------------
y) Yes this is OK
e) Edit this remote
d) Delete this remote
y/e/d> y
Current remotes:

Name       Type
=====     ======
gcloud     drive
pandoDr    drive

e) Edit existing remote
n) New remote
d) Delete remote
r) Rename remote
c) Copy remote
s) Set configuration password
q) Quit config
e/n/d/r/c/s/q> q
You are now enabled to access your Google Drive via rclone.
If you find you are having issues with connecting to your gcloud or box, or need to refresh a connection or token that has expired, look at this troubleshooting page for help.
Example 2: Configuration for transferring files to/from CHPC pando archive storage
There is a short training video that covers this process.
Rclone uses the Ceph Gateway box, pando-rgw1.chpc.utah.edu to interact with the archive storage. Please note that groups must purchase space on the Ceph archive storage in order to make use of this space. For additional information about the archive storage please see its description on the CHPC storage services page. For the Elm protected environment archive storage, the gateway machine is elm-rgw01.int.chpc.utah.edu.
As before, you will have to first load the rclone module and then you need to create a file in your home directory called .rclone.config with the following five lines, using the name of your choice, and the keys you were given when the space was provisioned. Note that if you already have a .rclone.config file, you can append these to that file, with a blank line after the previous configurations.
[name]
type = s3
access_key_id = your secret key
secret_access_key = your access key
endpoint = https://pando-rgw01.chpc.utah.edu/ # for general use Pando storage
endpoint = https://elm-rgw01.int.chpc.utah.edu/ # for Protected Environment Elm storage
Test if configuration works by rclone lsd {name}: You will see a list of all the ‘buckets’ (Ceph term for folders) associated with the gateway (make sure to include the trailing colon). As at this point you do not yet have any buckets, this should not give any results, but it should also not return any errors . To create a bucket run: rclone mkdir {$name}:{bucket}
NOTE: the bucket name used must be unique to all of pando. If you use a name that has already been taken, you will get the following error: “ERROR : Attempt 1/3 failed with 1 errors and: Forbidden: Forbidden status code: 403, request id: tx000000000000000e0f683-005afc84dc-19b5a49-default, host id:” If this happens, redo with a different bucket name.
Rclone Usage
In this section some common rclone usage cases are presented. In the following the name mydrive is being used. You would need to use the name you choose when doing your configuration. Note the trailing colon. This indicates to rclone that “mydrive” is a remote storage system, rather than a file or directory called “mydrive” in your current working directory. At any point, you may verify that these changes were successful by viewing your Drive from within a web browser. There is a short training video that covers the information presented below. Note that in Ceph, folders are referred to as buckets
- List all files in your Drive:
rclone ls mydrive: - List top-level buckets in your Drive:
rclone lsd mydrive: - Create bucket on PANDO:
rclone mkdir {$name}:{bucket} - Copy a file between two sources:
rclone copy SOURCE DESTINATION- Example: To copy a file called “rclone-test.txt” from your local machine home directory to your Drive, or a subdirectory within it:
rclone copy ~/rclone-test.txt mydrive:rclone copy ~/rclone-test.txt mydrive:my-rc-folder
- You can also transfer files directly between your Drive and another remote storage system, such as an object storage service for which you have configuredrclone:
rclone copy mydrive:rclone-test.txt myobjectstorage:some-bucket
- Example: To copy a file called “rclone-test.txt” from your local machine home directory to your Drive, or a subdirectory within it:
- Synchronizing directories is done with the sync option.
rclone sync SOURCE/ DESTINATION/ [--drive-use-trash]- Rclone can synchronize an entire Drive folder with the destination directory. This is a full synchronization, so files at the destination prior to the sync will be overwritten or deleted. Double check the destination and its contents, and be mindful if the directory is already being synchronized by other services.
- Example: To make a folder called “backup” on Google Drive, then sync a directory from the local machine to the new folder.
rclone mkdir mydrive:backuprclone sync ~/local-folder mydrive:backup
Rclone Options
While the full list of options can be found in the official MANUAL file in the Rclone github repo (or ‘man rclone’ if rclone is installed), some important options are:
--config=FILE(default FILE=.rclone.conf)
Specifies the rclone configuration file to use. Only necessary if the desired config file is not the default (which may be ~/.rclone.conf or ~/.config/rclone, depending on the version used).
-
--transfers=N(default N=4)
Number of file transfers to be run in parallel. Increasing this may increase the overall speed of a large transfer, as long as the network and remote storage system can handle it (bandwidth and memory).
-
--drive-chunk-size=SIZE(default SIZE=8192)
The chunk size for a transfer in kilobytes; must be a power of 2 and at least 256. Each chunk is buffered in memory prior to the transfer, so increasing this increases how much memory is used.
-
--drive-use-trash
Sends files to Google Drive’s trash instead of deleting (prior to a directory sync for instance). Note that this is not a default option, because the Trash is not accessible through Rclone and must be managed through a web browser.
--drive-formats(docx, pdf, txt, etc.)
Sets the format used when exporting files. For example, the option ‘–drive-formats pdf’ will automatically convert the chosen file(s) to PDF format.
Additional Important Considerations
- Google limits transfers to about 2 files per second. This may cause uploads of many small files to be much slower than the upload rate. However, it will not stop the transfer and will continue to retry files that were blocked by Google’s rate limit. Considering compressing small files into a single larger file if this becomes a problem.
- The campus firewall may impede larger transfers. The University has a Science DMZ network with Data Transfer Nodes (DTNs), which can be used to safely and conveniently facilitate larger transfers without the firewall’s limitations. Additional information on data transfer services can be found on our data transfer services page.
- Transfer ratemay vary heavily. A number of factors, including the current state of Google’s resources as well as University resources, determine the rate of transfer. Results may vary over minutes, hours, or days. If there is a consistent problem, check if machines associated with the transfer are running into network/disk/memory bottlenecks.
Automating Transfers Using Rclone
The file transfer process can be scripted, and the script can be used in conjunction with a cron job to automate a transfer. With these scripts a user can set up a periodic backup their data.
Examples for doing this to transfer to Google Drive are given in /uufs/chpc.utah.edu/sys/installdir/rclone/etc . The example scripts provided can be adapted for transferring data to other destinations such as pando. elm, or UBox.
Exploring the Effects of Options on Performance
In order to explore the effects of Rclone options on data transfer performance, we completed multiple transfers of the contents of a directory on a data transfer node (DTN), to a folder on Google drive. This directory contained 16 files, each 1.7GB each.
The data transfer node has a 40gbs connection on the University of Utah Science DMZ. To explore performance, we completed runs with the number of parallel transfers set to 4 and to 16 and with the chunk size set to 8MB, 16MB, and 32MB. The command was run ten times for each combination of options. A base transfer using a single transfer and a chunk size of 8MB is included as a reference point. The below chart displays the achieved transfer rates of the different scenarios.
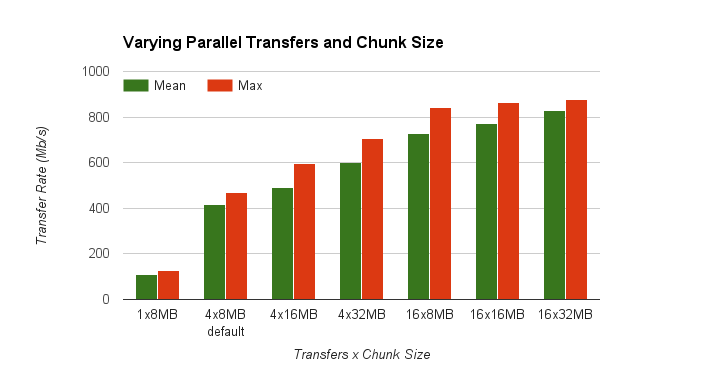
As the chart shows, increasing both the number of parallel transfers and the chunk size improves the transfer rate over using the default sizes.