If you want to use your own email address to receive support requests, and you’ve added your email address as a support address in Zendesk, then you can set up your custom email domain to verify that Zendesk can send email on behalf of your email server.
For example, if you receive email from your customers at [email protected], and you’ve set up an automatic redirect to forward all email received there to Support, you can authorize Zendesk to send out notifications as if it originated from your own email address (for example: [email protected]). That way you can preserve your branding throughout the entire process.
You don’t have to configure your email domain this way, but it’s recommended if you use your own custom email domain and have set up forwarding to an external email address. If you use a non-custom domain, such as addresses ending in @gmail.com or @yahoo.com, you can’t use this feature, as you won’t have access to the account DNS settings.Note: If you use the Zendesk Connector for Email to send emails, it’s recommended, but not required that you set up an SPF record to allow Zendesk to send email on your behalf (see Enabling automatic ticket creation for your Gmail inbox).This article includes these topics:
The advantages of this configuration
Note: To use this configuration, you must add your email address as a support address in Zendesk before proceeding.
So, do you have to allow Zendesk to send email on behalf of your email domain? The short answer is: No. The slightly longer answer is: Only if you really don’t want your customers to see the Zendesk name on their messages.
When Zendesk sends an email message using your email address (which is what happens if you’ve set up a support address with forwarding) the message identifies the sender as zendesk.com to avoid getting rejected. However, if you allow Zendesk to send email on behalf of your email domain, Zendesk stops sending messages from zendesk.com, and sends them from your domain, completely preserving your branding.
If you don’t complete the tasks described in this article, your customers might see something like this:

The following warning will also appear in the agent interface next to your external support addresses:
However, if you complete the tasks described in this article, the via statement and warning don’t appear.
Setting up records for your domain
Note: Setting up records for your domain can be confusing because it’s something most of us rarely do. Consult your system administrator, if you have one, before proceeding.
The process of setting up an SPF record is different for different domain registrars. For example, here are the instructions for GoDaddy, Namecheap, 1&1, Network Solutions, and Google Domains.
To create or edit an SPF record to reference Zendesk
- Edit your domain’s DNS settings to add a TXT record. The steps vary depending on your domain registrar. A TXT record is required for your SPF record to be validated.
Zendesk recommends using the following SPF record:
v=spf1 include:mail.zendesk.com ?allNote: While we recommend using ?all because it’s the least intrusive qualifier, you can use whichever qualifier you are comfortable with.
If you’ve already set up an SPF record for another purpose, you can simply add a reference to Zendesk to it. The SPF specification requires that you only have one SPF record on your domain. If you have multiple records, it may cause issues, and cause rejections of your email.
For example, instead of having two separate records, such as v=spf1 include:_spf.google.com ~all and v=spf1 include:mail.zendesk.com ~all, you can combine them into one, like this:
v=spf1 include:_spf.google.com include:mail.zendesk.com ~allIn the past, Zendesk suggested alternate formulations for SPF records, including include:smtp.zendesk.com and include:support.zendesk.com. These are both outdated SPF records. While they might still work, they’re not the best option. If you’re still using them, you’ll see a warning flag indicating you’ve set up an outdated record.Tip: Consider making an additional update to digitally sign outbound email from Zendesk to prevent your customers’ email clients from blocking email. Digitally signing email proves that an email actually came from your organization and not someone pretending to be your organization. For instructions, see Digitally signing your email with DKIM or DMARC.
Verifying your domain
Note: The task described in this section is not currently required, but will be required in the future as part of planned improvements to Zendesk Support, which is why we strongly recommend doing it now.
In order for Zendesk Support to send emails on your behalf, you must verify that you own the domain that you want Support to use. This is done by adding a TXT record (a domain verification record) to your DNS server that Support will check. The domain verification record is unique for each Support account and domain combination.
If you don’t add the domain verification record, Support sends emails from a Zendesk-provided email address. If you want to give your customers a white label experience, hiding all Zendesk branding, you must add this record.
To verify that a domain belongs to you
- Make sure you have finished setting up your SPF record.
- In Admin Center, click the Channels icon (
 ) in the sidebar, then select Talk and email > Email.
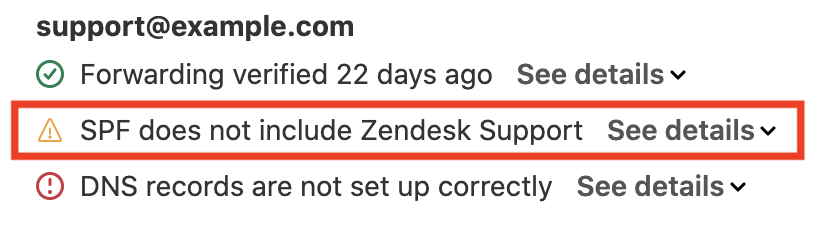
 - Locate the DNS records (located outside of Zendesk) for your Support address, then click See details to see the domain verification value. See the illustration below for an example.Note: If you are an agent with permissions to manage support addresses, you can use the Support Addresses API endpoint to find the domain verification code for your support address instead, if you prefer. Look for the domain_verification_code value. For more information, see the developer documentation about Support Addresses.
- Edit your domain’s DNS settings and add this TXT record:TypeNameValueTTLTXTzendeskverification<your unique value found in Support>3600 or use defaultYou can find the value next to the Domain verification TXT record check. In this example, the value is abcdef123456:
 Note: Your domain will be automatically appended to zendeskverification.
 - After you add the TXT record, click the Verify DNS records button to confirm that all of your records are now valid.If they are, the red error messages will be gone. If you’re having trouble setting up your DNS record correctly, see Why do I receive the error “DNS records are not set up correctly” when verifying my DNS records.
After your domain is verified, leave the domain verification record in-place.
If you decide to change your Support subdomain or host mapping later, you don’t need to update your domain verification records.
Understanding SPF checks
Sender Policy Framework (SPF) is a domain level email authorization protocol that allows you to declare which IP addresses are allowed to send email as if it originated from your domain.
This is accomplished by adding Domain Name System (DNS) TXT record. Think of DNS as a publicly accessible record for the internet. This record enables you to state publicly that Zendesk is an authorized sender for your domain.
When an email client receives a message, it performs an SPF check on the sending domain to verify that the email came from who it says it did. If this check fails, or there isn’t a DNS record that says that Zendesk is a permitted sender, some receivers might consider that email spam or a phishing attempt, and flag it as untrustworthy or not display it to your customers at all.
Zendesk avoids this by sending email using our own domain when we’re not authorized to use your domain, and by using your domain only when you authorize Zendesk with a proper SPF record. Generally, this helps to prevent emails from your Zendesk account to your customers from being incorrectly marked as spam. However, if you are having this problem, see How can I stop my emails from going into my customer’s spam folder?
If you’re curious, you can read more about SPF at www.openspf.org. If you’re having trouble verifying your SPF record, see Why is my SPF record not validating?